Saturday, September 10, 2011

Science Practical 21

TRANSFER OF THERMAL ENERGY

In this practical, there were 2 parts. The first part was to compare absorption of thermal energy by different surfaces. For part two, the aim was to find out which surface was better at radiating heat energy.

Experiment part 1
Apparatus:
2 Identical Twin Cans with Lids (one painted black and the other silvery/shiny)
2 Temperature Sensors 
Bunsen Burners
MultiLog
Wire Gauze
Procedure:

Put the temperature sensors into both tins. 
Wrap a piece of wire gauze on top of the barrel of the Bunsen burner.
Place the 2 tin cans on opposite sides of the Bunsen burner, both the same distance away from the Bunsen burner.
Start the MultiLog and take note of the starting temperature of both cans.
Light the burner and observe the change in temperature of the cans.
The can that was painted black absorbed more radiant heat energy than the other can.
The wire gauze that is wrapped around the barrel of the Bunsen burner ensures that the thermal energy is evenly radiated to both of the cans.

Experiment part 2
Apparatus:
2 Identical Tins with lids (One painted black and other silvery/shiny)
2 Temperature Sensors
MultiLog
Materials:
Hot Water
Procedure:
Fill each can to the same level with hot water.
Put the sensors into the cans.
Start the MultiLog and observe the temperature changes.

The black can lost heat faster than the silvery can.


Science Practical 20

Artificial Intestines
The aim of the experiment was to investigate why food has to be digested.
Materials
Boiling Tube
Visking tube filled with a solution of starch and glucose
Iodine Solution
Benedict's Solution
The Experiment
Tie the visking tubing up with a cotton thread.
Fill the boiling tube with distilled water.
Put the visking tubing in the boiling tube.
Test the water in the boiling tube for any presence of starch and glucose after one hour.
Visking tubing is used as ut has tiny holes in it that some molecules can pass through, similar to the small intestine.
To test the water for starch, you can add iodine to the water and it should turn blue-black if there is starch present in the water.
To test for glucose, add Benedict's Solution to the water. The solution will turn brick-red if glucose is present in the water.

Science Practical 18

Bouncy Raw Egg
This experiment was to show us osmosis in living cells.
We used a quail's egg that is enclosed in a thin membrane that is protected by a shell made of calcium carbonate.
The Experiment
Place the quail's egg into a beaker and fill the beaker with dilute hydrochloric acid.
Bubbles of colourless gas and white froth was observed to have formed and hence we can infer that the egg shell was reacting to the dilute hydrochloric acid and a gas was evolved.
Soak the egg in the acid for 15 minutes, stirring occasionally.
After about 15 minutes, pour away the dilute hydrochloric acid.
Then rinse the egg with water and examine it.
Next describe how the egg feels to the touch and record your observation.
Then measure and record the length of the egg.
Next fill half a beaker with water and place the egg inside.
After 30 minutes, remove the egg from the water and describe its hardness and record the observation.
Then measure and record the length of the egg.
Put the egg back in water and leave it for 24 hours.
Observe it again after 24 hours and describe its hardness and measure it and record both observations.
The dilute hydrochloric acid dissolved the egg shell. From the observations, the egg is soft and it grew after being put in the water. Hence we can infer the egg membrane lets water pass through. 


Osmosis in living cells allows water to enter the cell but prevents the contents of the cells from escaping.
Osmosis absorbs water into the cell, which the cell needs to survive.
The egg membrane is semi-permeable.

Science Practical 14

Separating Mixtures Part 1
The task was to separate salt and sand from the mixture.
Experiment
Place the mixture into a beaker. Add 10ml of water or more if it is needed until no salt is left. Stir the mixture. Place the filter paper into the filter funnel and put an evaporating dish below it. Pour the mixture into the filter funnel. Then heat the evaporating dish over a beaker of water being boiled over the bunsen burner. Make sure the salt solution boils is evaporated to dryness.
We used Filtration and Evaporation to dryness to separate the mixture of salt and sand into just salt and sand by themselves.

Science Practical 12

Forming Compounds
In this experiment, we had to investigate the formation of compounds by reacting compounds and elements.
Experiment(1)
Hold a magnesium ribbon with a pair of tongs and place it in the Bunsen flame. When the magnesium ribbon catches fire, put it above an evaporating dish to collect the ashes.
The magnesium combined with oxygen to form a compound.
Magnesium + Oxygen ---------> Magnesium Oxide
Experiment (2)
Place half a spatula of iron filings in a test tube.
Then add dilute sulfuric acid to a depth of about 2cm.
A new substance was formed as the iron filings dissolved into the sulfuric acid.
Iron + Sulfuric Acid ----> Iron Sulfate + Hydrogen Gas
Experiment (3)
Place sodium chloride in a test tube up to a depth of 2cm.
Then add lead(II) nitrate solution slowly into the test tube using a dropper.
A white precipitate was formed.
Lead(II) Nitrate + Sodium Chloride Solution -----> Lead(II) Chloride + Sodium Nitrate

Friday, September 9, 2011

Science Practical 11

Investigating Mixtures and Compounds
In this practical, we were required to do a few experiments and learn about the properties of a mixture and a compound.
Materials
Sulfur Powder
Iron Filings
Filter Paper
A piece of paper
Magnet
Some thoughts before the start of the experiment
Both sulfur and iron are elements.
When they are mixed, a mixture of iron and sulfur is formed.
When the are heated together, a compound, iron sulfide is formed.
The Experiment
We poured the sulfur powder on the filter paper.
Then we wrapped one end of the magnet with the piece of paper, then brought it close to the sulfur powder.
Next, we put the iron filings on an evaporating dish.
We brought the magnet close to the iron filings.
Then we poured the sulfur powder into the evaporating dish of iron filings and mixed it thoroughly.
We then moved the magnet close to the mixture.
Next we heated the evaporating dish over the bunsen burner until no other changes could be observed.
Then we moved the magnet close to the compound.
What we learnt
Heat is needed for the formation of a compound but not for a mixture.
Mixtures have the properties of its congruent elements but compounds do not have the properties of their congruent elements.
Mixtures can be separated by physical means while compounds cannot.

Saturday, July 30, 2011

Science Practical 19

Extracting Chlorophyll

Apparatus:
2 beakers (one 50 ml and one 250ml)
Variegated leaf (placed in sunlight for 3-4 hours)
Methylated Spirit (Alcohol)
Iodine solution
White tile
Forceps/ Tongs
Bunsen burner
Tripod stand
Wire Gauze

*Ensure that there is no heat source that could ignite the methylated spirits as it is alcohol*

Procedure:
1. Boil 150ml of water in the 250ml beaker.
2. Place a soft leaf in the boiling water for 1 to 2 minutes to break the cell structure in the leaf.
3. Turn off and remove the heat source.
4. Place the boiled leaf in 20ml of methylated spirits in the 50ml beaker. Place the 50ml beaker into the 250ml beaker which has hot water inside.
5. Jiggle or agitate the leaf using tongs/forceps till the methylated spirits is deep green and the leaf is white. (The chlorophyll is now in solution in the methylated spirits)
6. Remove the leaf and transfer it to the beaker of hot water for a while.
7. Gently place the softened leaf on a piece of white tile. Add a few drops of iodine solution to cover the leaf.

Conclusion:
The chlorophyll was successfully extracted from the leaf as there was no starch on the leaf. (The iodine did not turn blue-black)


Science Practical 17

Moving Waters(Teacher's Demo)
Aim: To demonstrate the process of Osmosis

Apparatus:
Beaker (400cm cube)
Capillary Tube (30cm long)
Retort Stand
Visking Tubing (15cm, knotted at one end)
String
50% Sucrose Solution
Marker Pen

Procedure:
1. Soak the visking tubing in water for 2 minutes. Remove when it becomes soft and pliable.
2. Clamp the capillary tube to the retort stand.
3. Pour the sucrose solution into the visking tubing until about 3cm from the top.
4. Place the visking tubing below the capillary tube. Move the visking tubing up so that the capillary tube is about 1cm into the sucrose solution.
5. Tie the open end of the visking tubing tightly using the string.
6. Rinse the outside of the visking tubing by dipping it into a beaker of tap water. then lower the tubing into a fresk beaker of water.
7. Mark the level of sucrose solution in the capillary tube. This is the level of sucrose solution at the start of the experiment.
8. Observe and mark the level of the sucrose solution at intervals of five minutes for about 90 minutes.

Conclusion:
Osmosis is a net movement of water molecules from a region of high water potential to a region of low water potential through a semi-permeable membrane.

Science Practical 13

Which can Dissolve More?

Aim: To find out if the solubility of different solutes differ in the same solvent.

*In experiments, we should always conduct a fair test. You should only change one factor and keep the rest constant.*

In this experiment, we want to find the solubility of different solutes, so the factor we should change is the type of solute.

Procedure:
1. Measure 20 cm cube of water into a beaker.
2. Weigh 1 gram of salt using the electronic beam balance. Put this amount of salt into the water.
3. Stir to dissolve the salt in water. If the salt dissolves completely, add another 1 gram of salt into the water.
4. Continue adding 1 gram of salt until no more will dissolve after stirring.
5. Repeat steps 1-4 twice using baking soda and iodine crystals.

From the experiment, we can infer that the salt is the most soluble in water, and iodine crystals is the least soluble in the water.

Conclusion:
Different solutes have different solubility in the same solvent.

Science Practical 10

Brownian Motion

Aim: To observe Brownian Motion of smoke particles in the air.

Apparatus:
Whiteley's Smoke Cell Set
Transformer
Microscope

Procedure:
1. Fill a smoke cell, with smoke from smouldering paper and cover it with a glass slip.
2. Illuminate the smoke particles with a bright source of light.
3. Examine through the lower-powered microscope placed at 90 degrees to the direction of the light and record what is observed.

Observation:
Against a dark background, bright spots of light are observed, and they are in continuous random motion.

Questions:
What are these bright spots actually and why do they appear to be bright?
They are smoke particles and reflect light from the light source.
What causes the 'bright spot' to move in the continuous random manner?
The air particles bombard/collide unevenly on all sides of the smoke particle, causing the continuous random motion of the smoke particle.
Do you think that there will be a difference in the motion of the smokes particles if the temperature inside the smoke cell is increased?
Yes. The smoke particles will move more quickly as the movement depends on the temperature, as the heat energy is converted to kinetic energy.
How can you tell which are the large particles and which are the small ones?
The larger particles are the ones that move slower than the rest of the particles, as the larger particles have more inertia than the smaller particles.
Suggest how you could observe brownian motion in liquids:
Suspend pollen grains/talcum powder in water and observe the movement under a light source and a powerful microscope.

Science Practical 9

Density of an Irregular Solid

Aim: To determine the density of an irregular solid.

Apparatus
Measuring Cylinder
A Glass Stopper
Tissue Paper
String
Electronic beam balance
Scissors

Procedure:
1. Weigh the glass stopper to determine its mass. Record its mass as M.
2. Pour water into the measuring cylinder to one-third of the cylinder's height. Note the volume as V1.
3. Tie the glass stopper to a string and lower it gently into the water. Note the volume as V2.
4. The volume of the glass stopper is V2-V1. Record the volume of the glass stopper as V.
5. Remove the glass stopper and dry it with tissue paper.
6. Repeat step 2 twice with different values of V1 and obtain the corresponding values of V2 and V2-V1.

Find the average volume of the glass stopper from the 3 readings.

Science Practical 8

Density of a Regular Object

Aim: To determine the density of a regular solid(glass marble)

Apparatus
Micrometer Screw Gauge


Small Plastic Bottle


Electronic Beam Balance


5 Similar Glass Marbles


Procedure:
1. Weigh the empty plastic bottle and record its mass as m1.
2. Place all 5 glass marbles into the plastic bottle and weigh again. Record the mass as m2.
3. Measure the diameter of one of the glass marbles from two different positions using the micrometer screw gauge. Record the diameter of the glass marble as d.

After finishing the experiment, we had to begin our calculations. We had to find the mass of one glass marble and record it as M.

To find the density of the glass marble, we had to take the glass marble's mass and divide it by its volume. Below is a link on how to find the volume of a sphere:

So why did we use 5 marbles instead of one?
To increase the accuracy of the result!

Science Practical 7

Measurement of Time - Pendulum

Aim of the Experiment: To determine the relationship between the period and the length of the simple pendulum.

Apparatus
120 cm of thread
Pendulum bob
Metre rule
Split cork
Stopwatch
Clamps retort stand

Procedure:
1. Fix one end of the thread to the pendulum bob. Clamp the other end firmly between the split cork, making pendulum of length l = 100.0cm long.
2. Give the pendulum bob a small displacement of between 0 and 10 degrees and set it into oscillation. A complete oscillation is when the bob goes from one end to the other end and back again.
3. Time the period for 10 oscillations using the stopwatch. Record the time as T1. Repeat steps 2 and 3 for another 10 oscillations and record the timing again, but this time record it as T2. Then, find the average of both readings as <t> and hence the periodic time T given by. (T = <t>/10)
4. Shorten length l of the string by pulling on its upper end, and repeat steps 2 and 3 for values of l varying from 90cm to 50cm.
5. Tabulate 6 sets of values of l. T1, T2, <t> and T.
6. Plot a graph of period T against length l.

Conclusion:
The shorter length l is, the less period T will be.

Science Practical 6

Measurement of Length

Micrometer Screw Gauge

Vernier Calipers
In this practical, we were taught how to use a vernier calipers and micrometer screw gauge(as seen from above). -We also used a metre rule but it has already been taught before-

The smallest reading for the vernier calipers(one vernier division) and the micrometer screw gauge(one thimble division) are both 0.01cm. 

In this practical, we did 3 experiments. Each experiment required to use of an apparatus that could be used to measure length. 

Experiment 1:
We had to measure the height of our seat from the floor from 4 different positions. This is very basic. The average height of the seat from the 4 readings should be taken as that would make the result more accurate.

Experiment 2:
Use the vernier calipers to measure both the internal and external diameters of a beaker at 3 different positions. Find the average of the 3 readings as then, the results would be more accurate.

Experiment 3:
Use the micrometer screw gauge to measure the diameter of the wire and ball bearings at 3 positions. Find the average of the results as it would be more accurate that way.

Here are links to show you how to use the vernier calipers and micrometer screw gauge.


Science Practical 5

Observing and Recording(Part 2)
This is the continued version of the previous practical.

In this experiment, we learned more about thermometers and how to record data as line graphs.

Thermometers: An apparatus used to measure temperature in degree Celsius. In school laboratories, the liquid inside the thermometer is usually alcohol with red dye added. Thermometers are made from glass and hence can be broken easily. Therefore, we should not put the thermometer on a surface where it could roll off easily. If the liquid in the thermometer is not alcohol, and instead a silver-coloured substance mercury, you have to take extra precautions as mercury is a poisonous substance.

Experiment Procedure:
In this experiment, we heated up liquid in a beaker again. However, this time the task was altered, we also had to record the temperature of the water and plot a line graph to show the changes in temperature of the water. The steps for successful completion of the experiment are below:
1. Set up the apparatus.(Retort stand placed on a heatproof mat holding on to a thermometer which is placed in a beaker of water on a gauze mat over the tripod stand. The bunsen burner should be under the middle of the gauze mat which is being supported by the tripod stand.
2. Use a 100ml measuring cylinder to measure 100ml of water and pour it into the beaker, and make sure the water does not splash. 
3. After a minute or two, measure the temperature of the water. This will be your starting point of the line graph (time is 0min, temperature is whatever temperature is shown on the thermometer).
4. Light the bunsen burner using the correct procedure that has been taught to produce a non-luminous flame (blue flame).
5. Once the fire starts, start timing and record the temperature quickly every minute for 10 minutes.
6. After 10 minutes, switch off the gas tap. Wait a few minutes for the apparatus to cool before keeping them away.
*Remember to put on your safety goggles!*

Questions that the practical answered for me:
1. What are the measurements we have just done for?
A: This measurements are data.
2. What is the data for?
A: To chart the temperature of the water over time.
3. How should we display our data?
A: Graphs are very useful in presenting data.
4. What graph would be appropriate for this data we have recorded?
A: A line graph would be the best as the temperature of the water increased gradually.

*This practical teaches us how to draw a line graph, which is very important*

Friday, July 29, 2011

Science Practical 4

Observing and Recording
In this practical, we were given 5 experiments to carry out, and we had to chart down our observations in a table.
*Remember to put on your safety goggles while conducting these experiments*

Experiment 1(Procedure):
 1. Pour vinegar into a clean test tube to a depth of about 1cm. 
2. Add a spatula of sodium bicarbonate.
Observation: 
The white sodium bicarbonate powder dissolved to give a colourless solution and bubbles of gas(effervescence of colurless odourless gas) were seen.

Experiment 2(Procedure): 
1. Quarter fill two clean test tubes with water. Add a spatula full of sodium carbonate to one test tube.
2.Shake the test tube until the sodium carbonate dissolves.
3. Add a dry spatula full of copper sulfate to the other test tube and shake it until the crystals dissolve.
4. Pour the contents of the second test tube into the first.
Observation:
After shaking the first test tube, the white sodium bicarbonate dissolved to give a colourless solution.
A blue solution was seen after the crystals dissolved in the second test tube.
A blue precipitate was seen when both solutions were poured together.

Experiment 3(Procedure):
1.Use an eye dropper to place one drop of methylated spirits onto the back of one hand.
2. Blow air gently across the back of your hand.
Observation:
There was a cooling sensation on the back of my hand where the methylated spirits was.

Experiment 4(Procedure):
1. Quarter fill a very small beaker with limewater.
2. Gently blow out through a drinking straw into the limewater.
Observation:
A white precipitate formed in limewater.

Experiment 5(Procedure):
1. Place a few drops of starch suspension in a clean test tube.
2. Add a drop of iodine solution.
Observation:
The iodine solution turned from yellowish-brown to blue-black due to the starch.
*Do not get iodine solution onto your skin or clothes*

Science Practical 3

FLAMES

In the previous practical, we discussed about the yellow and blue flames. In this practical, we will go more in-depth on the details of these 2 flames. The yellow flame is a luminous flame, while the blue flame is the non-luminous flame. 

Now, we shall discuss the differences between the two flames.

 Luminous Flame
Non-Luminous Flame
 Colour of flame:
 Yellow
 Blue
 Steadiness of flame:
 Steady
 Unsteady 
 Visibility of the flame:                (10 steps away from flame)
 Visible
 Not visible
 Observation when holding an ice-cream stick over the flame and moving it up and down about ten times:
 Ice-cream stick burns slower
 Ice-cream stick burns/catches fire quickly
 Temperature of flame:
 No
 Much hotter than luminous flame


Part 2 of the lesson:
For the next part of the lesson, we learnt to heat a substance(water) in a test tube.

1. Carefully pour water into the test tube until to a depth of 2cm.
2. Add a drop of food colouring to the water in the test tube to make it more visible.
3. Light the bunsen burner with the way you learnt how to in the previous practical and heat the test tube gently over the non-luminous flame.
4. When the water starts  boiling, turn off the gas tap.
5. Place the test tube back in the test tube rack(hold the top of the test tube to prevent being scalded).
6. Leave the test tube to cool before removing the contents.  

*Always wear safety goggles when heating substances*
*Do not hold the test tube in your hand as it might slip and break*

Science Practical 2

A Bunsen Burner,  one of the
most important apparatus in
the laboratory
HOT STUFF


In this practical, we were taught about the bunsen burner, and how to light it up.

The bunsen burner is made up of five important parts,the barrel, air hole, gas jet, collar and the base. Together with the gas tap, a fire is possible. I will give the description of each component of the bunsen burner, as well as the gas tap.

Barrel: To raise the flame to a suitable height for burning.
Air hole: To allow air to enter the burner
Gas Jet: To enable the gas to rush out from the gas supply and draw in air
Collar: To control the amount of air entering the burner by opening or closing the airhole
Base: To support the burner so that it will not topple
Gas Tap: To control the flow of gas to the bunsen burner


After learning about the parts of the bunsen burner, we learnt the steps that had to be taken to light a bunsen burner.
THE PROCESS:
1. Check the rubber tubing is connected to the gas tap.
2. Make sure the air hole is closed (collar is covering air hole).
3. Use the striker ( a gold-coloured thing that produces a spark for the gas to light up) and bring it to the top of the barrel.
4. On the gas tap for the gas to flow out.
5. Use the striker which will produce a spark to light up the gas, producing a flame.

TA-DAA! That is how you get a flame on a bunsen burner.

*The gas from the gas tap is poisonous. Always ensure the gas tap is off when you are not using the bunsen burner.*

Strike backs:
Strike backs occur when the air hole is fully open. Instead of burning at the top of the barrel, the flame will be burning in the jet. The flame will be green and will produce a loud sound. When you see or hear this, turn off the gas tap IMMEDIATELY. After that, do not touch the collar immediately as it may be hot. Allow it to cool down before touching it again.

2 Different Flames:
There are 2 different coloured flames, one blue and one yellow. The yellow flame is not hot and is easy to see, while the blue flame is hot and used for heating, and is quite hard ro see. The next practical will explain more on these different flames.

Science Practical 1

In this practical, we got to know the science laboratory.

There are student work benches, which are high stools, gas taps, sinks, fire extinguishers, rubbish bins, doors, the teacher's desk, power points, first aid box, poster on laboratory rules, and an empty bucket for water. Interestingly, there is also a fire blanket and a shower.

The laboratory is quite stuffy and hot at times, but usually, it is cool and ventilated. I really enjoy lab lessons as it really gets the students involved in the lesson.

Then, we were introduced to the hazards, which were mostly symbols around the science laboratory.

Corrosive Substances

Explosive Substances


Flammable Substances

Poisonous Substances

Radioactive Substances


Then, we were introduced to some of the apparatus in the laboratory. One of the new apparatus to me was the burette.


That was basically what was thought in Practical 1, just an introduction to the laboratory. An interesting start to more lab lessons!


Tuesday, April 5, 2011

Measurements

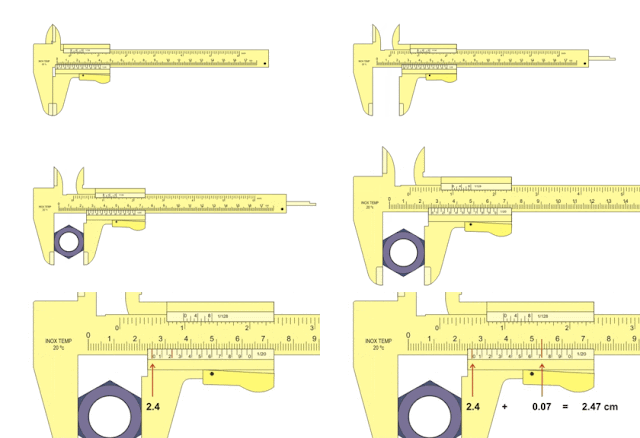
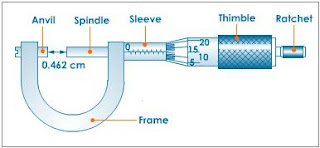
Measurements. What are they? A measurement is a figure, extent or amount obtained by measuring. For this chapter, we learned how to use measuring tools and also how important units are. We learnt how to use the vernier caliper and the micrometer screw gauge ( both below). These 2 tools are very effective for measuring as we know that not all things can be measured with a metre rule. 


Units are very important in our lives. Without them, it would be so hard to communicate. Imagine if there were no units and you were supposed to run a marathon. How puzzled the participants would be when they see 15 as the total distance. Questions like is it 15mm, 15cm, 15m or 15km would be circling around in the participants' heads. See the importance of units now? Units also help scientists to record down the amount of something for references. For example we use watts and volts for electricity, and millilitres and litres for water. Scientists cannot put down watts for water and litres for electricity.

There is also something called SI which stands for System International. There are SI base units and SI derived units. The base units are what SI was founded on. These seven quantities are assumed to be mutually independent. The table below shows us the 7 units.

There are 22 derived units altogether. Here are some examples of derived units.

So I have learnt the importance of units and also how to use some of the measuring tools that are new to me. I think that the new skills I have learnt in this chapter will surely help me in the future.

Science as an Inquiry

What is science? According to the Webster dictionary, Science is :
1.  the state of knowing
2a. a department of systematized knowledge as an object of study
2b. something that may be studied or learned systematized knowledge
3a. knowledge or a system of knowledge covering general truths or the operation of general laws especially as obtained and tested through scientific methods
3b. such knowledge or such a system of knowledge concerned with the physical world and its phenomena
4.  a system or method reconciling practical ends with scientific laws
5. christian science

Well, I do not know what christian science is. Science to me, is knowledge. But science is very general, and not all questions are answered. So, science is also a mystery to some. After this chapter, I had a deeper understanding of what science was. It was not only knowledge, but about methods, attitudes and products. Science is also full of theories, principles and laws that people have created and proven, like Newton's law of gravity and the theory of evolution.

I also learnt some science laboratory rules. This is the first time I am doing experiments that have fire and liquids involved, so the safety rules were very important. We also learnt about the signs like the radioactive sign ( on the left).


To conclude, this chapter of science was the introduction for the whole year, and it was interesting. I learnt many useful things and have gained a deeper understanding of science.